Wow, its been over a month since my last post. I've been quite busy with the day job and family stuff.
One thing that has been floating around in my head for a few months now is to do some special effects tutorials. If this is something you're interested in seeing let me know.
-Jake
Sunday, May 27, 2007
Thursday, April 19, 2007
Updated Animatic
Here's an updated Animatic as of April 18th. It's coming along nicely I think. Let me know what you think. One thing to note is the animated background scene. I've decided to cut it. I felt that it didn't flow with the story as a whole. Which is too bad because I'd had it all worked out how it was going to look and work.
Download the QuickTime here.
Next should be Part 2 of Anatomy of a Scene.
Stay tuned
-Jake
Download the QuickTime here.
Next should be Part 2 of Anatomy of a Scene.
Stay tuned
-Jake
Monday, April 16, 2007
Beaver Walk Cycle Breakdown Updated
I thought since I finished scene 01 where the walk cycle came from I would update the beaver walk cycle breakdown adding the Clean and Painted versions.
See the original post here.
One thing to note is, in the cleaned-up version there is a green line on his nose. This is for when I add the colour I know I need to paint this as a highlight. I don't clean up the nose in the highlight colour because I would never see it with a white background.
Download the QuickTime here.
Thats all for now
Stay tuned
-Jake
Sunday, April 8, 2007
Anatomy of a Scene Part 1
What I'm going to show is how I get from the Storyboard to a Completed scene. This will be quite an extensive overview so I will break it down into a few parts.
Part 1
First I start with the Storyboard see this post for more details. One thing I forgot to mention in the Storyboard post was that I work at 24fps or 24 frames per second. After I have the Storyboard done I then highlight all the frames and layers for that scene and Copy Frames.
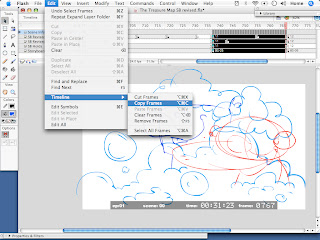
I then open a new Flash file and use Paste Frames. I now have all the layers, timing, staging and ruffs from the storyboard.
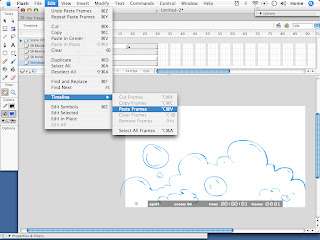
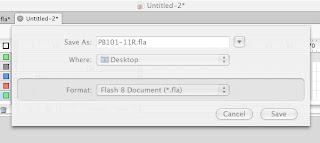
I then save the file. The way I name my file is this PB101-01. It is based on the same method for the studio I work for Collideascope. Its very useful, I can quickly find a scene that I want to work on, and the stage the scene is at.
The breakdown of this is as follows.
PB = Platypus and Beaver.
1 = the "season" number. If I am able to complete a lot of these then the 1 will become 2.
01 = the show number. Again if I have time to complete a second short it will be 02
-01 = the scene number. The scene I'm using for the break down is 11. So the whole name for this scene is PB101-11
and lastly I add a letter the to end of the scene name so it looks like this PB101-11R
SB = Storyboard
BG = Background
R = Ruff
C = Clean
P = Paint
FX = Special Effects
Next I create a new layer. I then start to ruff in the key poses in the action. At this stage the drawings are still really ruff similar to the storyboards. By keeping the drawing quick and ruff I will not fall in love with a single drawing and wont feel bad when I have to delete it a create a new one. Once I started animating I realized I needed more time then what I gave myself in the Storyboard so I extended the scene. I also noticed I left myself no room for any animation, so I re-staged the scene to give myself more room. After I have the ruff animation completed I will then render a QuickTime of the scene to see what it looks like.
What I have here is Storyboard to Ruff animation.
Download the QuickTime here.
Thats if for this post In a few days I'll post Part 2 of Anatomy of a Scene.
Stay tuned
-Jake
Part 1
First I start with the Storyboard see this post for more details. One thing I forgot to mention in the Storyboard post was that I work at 24fps or 24 frames per second. After I have the Storyboard done I then highlight all the frames and layers for that scene and Copy Frames.

I then open a new Flash file and use Paste Frames. I now have all the layers, timing, staging and ruffs from the storyboard.

I then save the file. The way I name my file is this PB101-01. It is based on the same method for the studio I work for Collideascope. Its very useful, I can quickly find a scene that I want to work on, and the stage the scene is at.
The breakdown of this is as follows.
PB = Platypus and Beaver.
1 = the "season" number. If I am able to complete a lot of these then the 1 will become 2.
01 = the show number. Again if I have time to complete a second short it will be 02
-01 = the scene number. The scene I'm using for the break down is 11. So the whole name for this scene is PB101-11
and lastly I add a letter the to end of the scene name so it looks like this PB101-11R
SB = Storyboard
BG = Background
R = Ruff
C = Clean
P = Paint
FX = Special Effects

Next I create a new layer. I then start to ruff in the key poses in the action. At this stage the drawings are still really ruff similar to the storyboards. By keeping the drawing quick and ruff I will not fall in love with a single drawing and wont feel bad when I have to delete it a create a new one. Once I started animating I realized I needed more time then what I gave myself in the Storyboard so I extended the scene. I also noticed I left myself no room for any animation, so I re-staged the scene to give myself more room. After I have the ruff animation completed I will then render a QuickTime of the scene to see what it looks like.
What I have here is Storyboard to Ruff animation.
Download the QuickTime here.
Thats if for this post In a few days I'll post Part 2 of Anatomy of a Scene.
Stay tuned
-Jake
Saturday, April 7, 2007
Scene 01 is Painted
I've was able to get scene 01 cleaned-up and painted last night. I'm pretty happy with the results. I'm now remembering what a pain in the ass clean-up really is. I hope that I get faster and better as I progress through this.
Download the QuickTime here.
I hope to have more done over the weekend, but there is alot of family visiting and feasting that needs to be done.
Stay tuned
-Jake
Download the QuickTime here.
I hope to have more done over the weekend, but there is alot of family visiting and feasting that needs to be done.
Stay tuned
-Jake
Thursday, April 5, 2007
Cold Hard Flash
I made it on to the front page of Cold Hard Flash.
Thanks to Ron for bringing it to Aaron's attention. I guess I'll have to make sure I work on this as much a possible.
-Jake
Thanks to Ron for bringing it to Aaron's attention. I guess I'll have to make sure I work on this as much a possible.
-Jake
Monday, April 2, 2007
Ruff Animation
I was able to get alot of the ruff keys completed this weekend.
This time I'm posting the middle sized movie this time. I found the larger movie messes with bloggers layout, the larger video still plays fine. I can change it to the larger video if anybody wants.
If anyone wonders why I use Dailymotion rather then YouTube is because Youtube does not like widescreen video.
UPDATE: I'm now going to start using Revver from now on. The reason for this is because they offer a QuickTime option that you can download at a much higher quality then the embedded version.
Heres the latest Animatic. updated
download the QuickTime here.
My process as you can see involves me getting down some really ruff key poses first. I do this in one colour for each character. There are two reasons for this. One is for consistency, and two so if you only see a piece of the character you know who it is, before colour is added. Once I'm happy with the ruff keys I tighten up the poses, getting them on model and try to get the volumes and size relation right. I do this on a new layer over the ruffs. Drawing it in a dark grey colour, then colouring the characters white so they stand out. This way I can see the true motion. I say true motion because characters appear to move faster when its just the outline then they do with colour, because your concentrating on a solid object rather the a thin line.
Again let me know if you want more information then I'm providing here. Or if I'm providing too much.
Please leave a comment let me know what you think.
Up next I hope to have all the keys tightened up over next weekend.
More next week
Stay tuned
-Jake
Monday, March 26, 2007
Walk Cycle Animation
Finally I have some animation done.
What I've done is try to show how I build up a walk cycle. The different colours correspond with different layers being used. I've kept the arms on their own level because I will need to flip the animation and the shovel and arm will need to be animated over the far shoulder.
Still lots of animation to do. Of course I will post more when I have more completed.
Stay tuned
-Jake
Friday, March 23, 2007
Updated Animatic
I couldn't resist seeing what the backgrounds look like in the scenes. I had to adjust the first two scenes. In scene one the pan was to quick which I doubled its length. In the second scene I added a stop to the panning background.
Here it is.
Stay tuned
-Jake
Here it is.
Stay tuned
-Jake
Backgrounds
Not much to say about these. Very simple backgrounds. I may tweak the colours later if the colours are too saturated. It might turn out that the characters are hard to see on them. In all I figured I would need six static backgrounds. One will be animated when Platypus is going through the tunnel.
Here they are.


In the last two backgrounds, the bubbles are just a placeholders. I'm planing on animating them just to give the scenes more life. Also in the under water background I will have to add some under water effects.
Next up Ruff Animation.
I will be keying the scenes out. I'm still debating is I should insert the scenes as I go into the animatic, or if I'm just going to upload the scenes as individuals? I guess I will have to wait and see.
Stay tuned,
-Jake
Tuesday, March 20, 2007
Storyboard & Animatic
Jump to the bottom of the page for the animatic.
The inspiration/ideas for the first story Treasure Map came from 2 sources.
First was this sketch I did while my wife Lilly was watching some sort of reality tv show.

The second source was this.
The Russian Winnie the Pooh.
I just love the whole intro with Pooh marching and singing in the forest.
After I have the idea I open Flash and draw the storyboard directly in Flash using my trusty Wacom tablet. This took me one evening or about a few hours to complete. Here's a screen grab of the storyboard.

As you can see I drew everything on 1's, and really ruff. I'll be tightening up the background and characters later.
Here's a detailed image of the timeline.

There are a few things I want to point out.
First is I like to keep elements to their own layers with a description of what it is.

Second thing is labeling the scenes 01,02,03 and so on. This is useful when timing out the storyboard into an animatic, more on this later.


Third thing is as well as labeling the scenes is to label the backgrounds. Remember reuse is your friend, only if your well organized. Mislabeling will cause problems down the road.

Once I have all the basic story information down. I added lots and lots of frames to get the storyboard timed out to a length that felt right. This was most of Sunday afternoon. Lots of back and forth between QuickTime and Flash, making some scenes longer or shorter till it's just right. Which can be seen here.

Now this being my own film I'm not restricted to ridged time restraint. So I can add or remove frames to make it work.
Some of you might be wondering what's with the red "O" is, or what it's for. Well I'm trying to keep it timed to a tempo of 120, so when I add music later the action is ruffly timed to a beat. This beat just so happens to be every 12 frames. I'll be using this as a guide only.
Here's the final animatic.
If this had too much or too little information let me know. I want to post what people are wanting to see.
Up next I'll be seperating the scenes into their own files. Once this is done I'll be tackling the layouts and backgrounds. I'll update when I have more to post.
Stay tuned.
-Jake
My evil plan revealed.
So what is this "experiment" that I'm planning?
I love behind the scenes material, and production diaries, just the whole how films are made. I find it interesting seeing the way different people work with animation in Flash. This is what I plan on using this blog for, keeping track of my production of Platypus & Beaver, with screen shots of how I work.
The other reason I'm doing this all out in the open and online like this is, I'm hoping that if I have stuff posted and out in the wild it will keep me motivated to finish.
My plan is to do everything in Flash. With the exception of final composition, this most likely will be in either QuickTime or iMovie. The other thing that will not to be done in Flash is the sound which I plan to do in GarageBand. I've also imposed boundary's for myself to try and keep the shorts under one minute in length. If all goes well then there will be more Platypus & Beaver. I have lots of ideas bouncing around inside of my head.
First things first. Here's a picture of Platypus & Beaver.

I don't have any model sheets completed. Mostly because I'm the only one working on P&B so quality control is easy to manage.
Up next, the Storyboard and Animatic process.
Stay Tuned
-Jake
Sunday, March 18, 2007
First Post
This will be the home of my Flash cartoon experiment I call, Playtpus & Beaver.
My intension with this blog is to update weekly. Most likely on, or just after a weekend. (I do have to work at my day job)
Or I'll put something up here when I have something to post.
Should be fun and interesting for all.
Stay Tuned.
-Jake
My intension with this blog is to update weekly. Most likely on, or just after a weekend. (I do have to work at my day job)
Or I'll put something up here when I have something to post.
Should be fun and interesting for all.
Stay Tuned.
-Jake
Subscribe to:
Posts (Atom)
